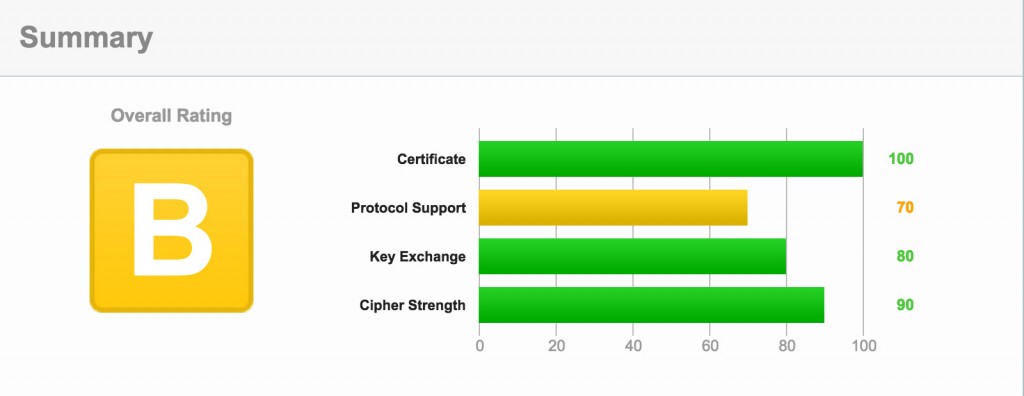
Update 3pm: After MUCH research I finally found that Plesk sucks. Further to this there are some fixes that were required for Plesk to ensure it was more SSL friendly. These updates moved me from an F to a B – http://kb.odin.com/en/123160
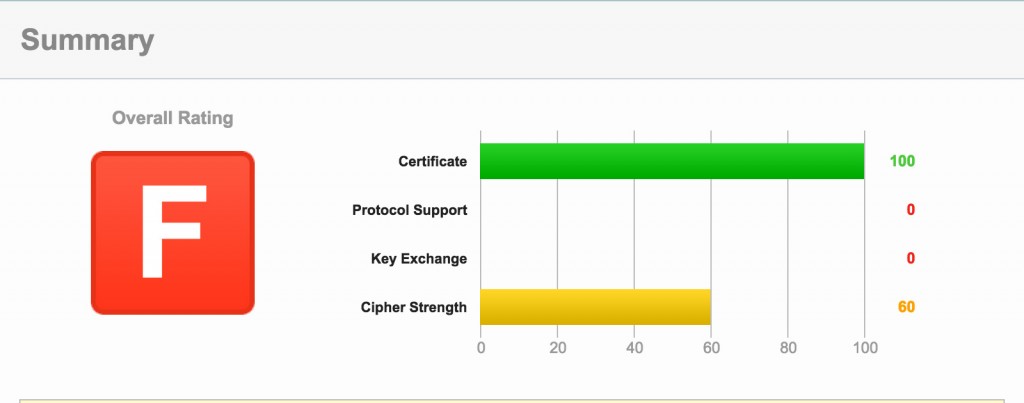
Update 11am: The certificate was just the first step. I’m getting an F for security at the moment because a bunch of server vulnerabilities need to be fixed. You can see the real results here https://www.ssllabs.com/ssltest/analyze.html?d=ami.responsivedesign.is
Yesterday I joined the Indie Web Camp in Dusseldorf at the lovely Sipgate. One of the topics that were discussed was around HTTPS and SSL.
I challenged Jeremy Keith last night over a beer just what the point of using SSL on an otherwise public website. I figured that if all of the content on the site was publicly available then there was no point in making it secure.
He, of course, set the record straight by explaining that it is more for the person receiving the information. By serving his content over https then people snooping on what I might be looking at will have a hard time seeing that I was reading his blog, and also I could be sure that there was no “Man in the Middle” that were changing Jeremy’s well chosen words.
I was sold.
Getting Stared: Obtaining the SSL Certificate
This proved to be comically difficult. I went to go with NameCheap to purchase the certificate as they were only €8 for a domain (Wildcard is much more expensive). It was pointed out that I could get a free Certificate at StartSSL, this was also one of the topics during the chat yesterday… everyone felt it was wrong to be charging so much money for certificates.
The comical bit came when I registered with StartSSL and was notified that it would take up to 6 hours to be issued with a certificate, and then proceeded to give me a SSL Certificate error when trying to log back in and check the status.
Back to NameCheap.
I purchased the certificate and was away.
Enabling a certificate on you host
There are a few different hosting providers that I use. One of which is a friends server and he provides Direct Admin to manage my account. The site I was looking to SSL enable was ami.responsivedesign.is and it was hosted through my friends server, but unfortunately that particular server configuration would only allow his own parent domain to be assigned a certificate. Back to the drawing board.
I have two other hosts, a handful of Digital Ocean boxes (one of which runs responsivedesign.is) and Media Temple, something that is set up perfectly to manage multiple domains.
After locating the DNS provider for the site (Cloudflare controls the DNS for these sites as responsivedesign.is is using a paid account there) I was able redirect traffic from the old host to the new location of the site, my Media Temple site.
Generate a CSR Code
This is the first step after buying the SSL certificate. It is done through the Plesk Control Panel provided through media temples hosting interface. Specific details on that process can be found on the Plesk site https://www.namecheap.com/support/knowledgebase/article.aspx/9447/0/plesk-12
Activate the Certificate with CSR Code
Once you have the CSR code (and you’ve safely saved the Private Key as well, I use 1Password for this stuff) then you will need to validate the request. You can either do this through WHOIS Record but the easier way would be to do it through an email verification. For this you will need an email account assigned to your domain ([email protected] is the one I had, but that wasn’t a choice for emails). You will want to have admin@ hostmaster@ webmaster@ or administrator@ as an email address to enable this. I host my emails through Google Apps so I was able to go through the user profile and add an alias for [email protected].
You need to confirm the details and an email will be sent to the address containing a link with a code for you to copy and paste. This took a few minutes to arrive and I pasted and submitted the confirmation which then results in another email being generated, although this time the email is generated to the administrative contact you specified when you confirm the details (for me this is justincavery at gmail).
Three emails were sent. One was a thank you, the other was encouraging me to include a SEAL on the site (which pretty much advertises the SSL Certificate provider) and the final one contains a Zip file with 4 .CRT files and also a plain text for your domain certificate.
The plesk instructions, https://www.namecheap.com/support/knowledgebase/article.aspx/9448/0/plesk-12, show that there is a standard certificate and then a bundle. I didn’t actually get the bundle as part of this process however Francis explained that I was able put them all into a single file myself, so I added each of the other three files into a single file and named it ami_responsivedesign_is.ca.bundle
I was expecting fireworks when I clicked on commit but it simply added the contents of the files into the page and refreshed. Pfft.
Enabling SSL/HTTPS
On Plesk go to the Host Settings where you can update the domain name, hosting type, document root etc. The second option on this page is “Security”.
SSL support should be ticked and you can pick the certificate from the select box. Save the changes and you are AWAY!
Check SSL has worked
You can head over to http://www.sslchecker.com and test to see if the site now passes.
You can see the results of Ami.ResponsiveDesign.is http://www.sslchecker.com/sslchecker?su=2c792e566363ebd0cd60f60172f352e9
Redirecting http to https
The final step is to ensure that all your traffic will now be hitting the https version of your site. Depending on your hosting setup this can be done in a few ways, I found that .htaccess was the easiest approach.
By adding the following to my .htaccess file I was able to redirect all traffic
RewriteEngine On
RewriteCond %{SERVER_PORT} 80
RewriteRule ^(.*)$ https://ami.responsivedesign.is/$1 [R,L]
And we’re done. You can try this out for yourself by heading to http://ami.responsivedesign.is and you should be redirected to the secure version of the site. Hoorah!