As someone who has only ever ventured into Crypto by buying it through a Coinbase app the whole process of getting into NFTX has been a long and confusing one.
The good news is that I’ve hit every snag you could have, so I’m here to take you through the steps if you decide you want to try it out yourself.
I’m not going to go into what NFTX is in this post, I’ll assume you’re already aware if you’ve arrived here searching for how to buy it, but you can read up more about it on the NFTX blog.
The first thing you need is a wallet to contain your cryptocurrency/tokens/collectables… whatever it is you are going to buy (in this case it’s NFTX Tokens).
Head over to MetaMask.io and download their app to your device of choice and create an account with them. This is going to be your wallet where all the assets are kept. Because this is crypto/NFT’s you’re not able to just buy them with cash or from your own bank account.
You can also install the Chrome Extension which they promote, but there are also extensions for Firefox, Brave, and Edge as well.
# Tip 1
You’re probably going to want to do this transaction on both a mobile and a desktop.
The mobile will allow you to download the apps you need and you can keep an eye on your investments there, but the desktop is where it’s easier to make the purchases because phones are tricky (especially iOS).
Once you have set up your account you’re going to need to use some actual hard earned cash to buy ETH for your MetaMask wallet.
You can do this via the app by adding one of your bank accounts (don’t worry, you have to transfer the funds and it won’t set up a direct debit) and then selecting how much money you want to transfer.
Once you’ve chosen the amount and gone through to confirm you’re happy to proceed you will be given the details for the bank account that you need to use to transfer the money across, and it will give you a timeframe in which you need to complete this.
You then need to go to your online banking app and set up a transfer for the amount of money you specified to the bank details they provided you.
# Tip 2
Two tips in one. If you’re doing this trade after hours then you will need to wait until the morning before your bank will allow the money to be transferred (this was true for HSBC in the UK).
Also, because the bank account you’re transferring to isn’t a traditional bank you’ll flag a fraud check, so if you want your money transferred quickly I’d get in touch with your bank to let them know.
UPDATE 18th January: it seems like a lot of banks, specifically HSBC for me, are no longer going to provide the ability to withdraw crypto currencies to their accounts. HSBC have also said that will not allow deposits into exchanges as well, but I’m yet to have the chance to test this.
Once you have successfully transferred your money over you will be notified that the transaction is complete, and you will see the ETH funds in your MetaMask wallet on your phone/browser.
Buying NFTX via UniSwap Matcha
Head over to UniSwap via this link https://app.uniswap.org/#/swap?outputCurrency=0x87d73e916d7057945c9bcd8cdd94e42a6f47f776
The NFTX liquidity pool has recently moved from UniSwap over to SushiSwap. This provides a number of benefits, including an additional USD$ 470k per year in liquidity earning.
To make it simple, head over to Matcha via this link https://matcha.xyz/markets/NFTX/ETH. Matcha is an aggregator decentralise exchange which means you will get the best price across a number of different exchanges so you don’t need to know them all.
At the end of the day, it all ends up in your MetaMask wallet so it doesn’t really mean where you buy from, but Matcha is super simple. The rest of this tutorial looks at UniSwap still (for now), but the process is almost identical anyway.
You will see the following warning, which happens every time you go to a linked transaction on UniSwap.
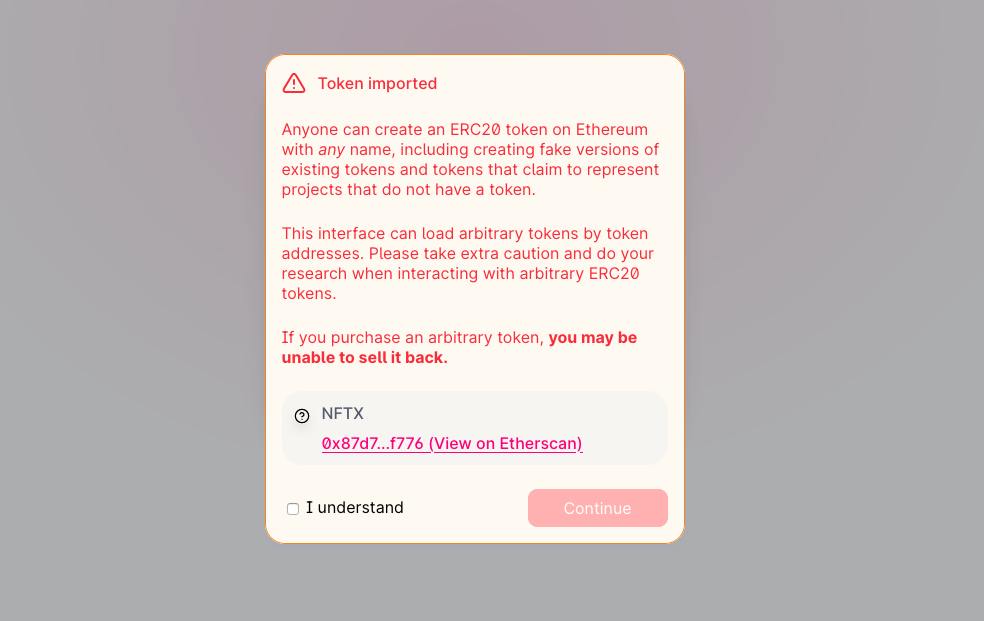
You can ignore it (because you trust me), but you should also verify on Etherscan.io that you’re buying the right token (https://etherscan.io/token/0x87d73e916d7057945c9bcd8cdd94e42a6f47f776)
Connecting your wallet to UniSwap
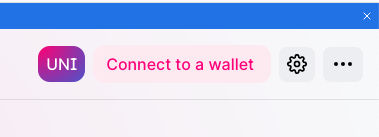
Click on the Connect to a wallet link and then choose MetaMask from the list (assuming you’ve got the MetaMask extension installed and you’re logged in).
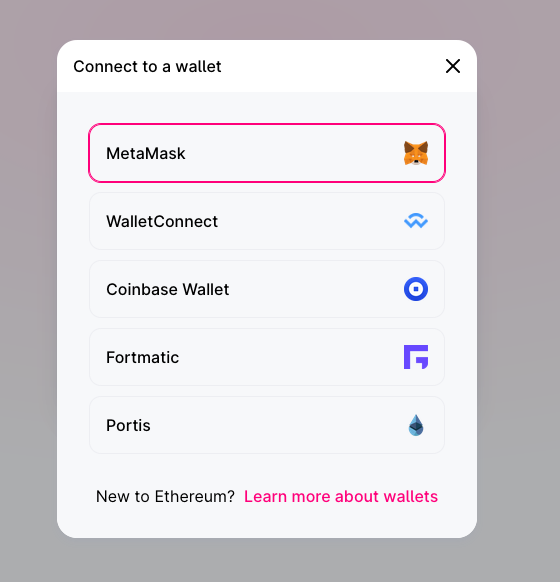
Agree to the prompts that pop up, and then you’ll have the ability to use the ETH in your MetaMask.
Common Issues
Here are a list of common issues I’ve seen (and experienced).
I’ve bought NFTX now, but I can’t see it in my MetaMask Wallet… WTF!
Relax, I haven’t scammed you. You need to add the NFTX token reference to your wallet.
- Click on the extension
- Scroll to the bottom and select “Add Token”
- Paste in 0x87d73e916d7057945c9bcd8cdd94e42a6f47f776 and you will then see the NFTX purchase.
Thanks for the tutorial. Uniswap says nftx is an “inactive token” and to buy at my own risk. Is it safe to buy?
Inactive? So not the error that is in the blog? I know that NFTX has just moved from UniSwap over to SushiSwap.
Your best option (and I’ll update the blog to reflect this) is to go on https://matcha.xyz . This will look at a range of different exchanges and give you the best price.
Inactive? So not the error that is in the blog? I know that NFTX has just moved from UniSwap over to SushiSwap.
Your best option (and I’ll update the blog to reflect this) is to go on https://matcha.xyz . This will look at a range of different exchanges and give you the best price.
my metamask wallet seemed to figure it out and get the token even though I was warned it was inactive. Hmm….
Now we shall see if virtual bacon’s recommendation alone is enough to see some gains. lol.